I colored him with copics and then layered the image onto some pink cardstock. I ran the black through my Cuttlebug with a new Sizzix embossing folder. The heart paper is left over from last year, not sure who the manufacturer is.
Thursday, January 27, 2011
Sunday, January 23, 2011
Something New
I came across a new digital stamp site by accident last week and immediately fell in love. They are from Lori Boyd and you can find them at her store by Lori Designs .
I picked out two "lollipops" that I just couldn't resist, helps that they are named Hannah and Gracie--my daughter and granddaughter's names.
I used Gracie for this card and decided to use the colors in the By Lori Designs challenge; red, yellow, brown and beige. I came across this flower paper in my stash it is from My Mind's Eye Garden Party collection. I added a strip of red cardstock along the bottom, added rectangles in the matching colors and used some of my new twine from The Cat's Pajamas to attach a button. I cut the image out leaving a little white border along the edge and then layered her onto another strip of red cardstock.
If you have a chance, stop by Lori's store, nothing like digital stamps for instant gratification!
Thanks for looking!
Honey Bear
This has to be one of my favorite
Valentine's Day stamp sets. It is called
Honey Bear and is from The Cat's
Pajama's.
Our last name is Bear and for the longest time my wonderful hubby has called me Honey Bear.
I used Jen's sketch from I Heart 2 Stamp for the layout. I embossed PJ's honey pot onto green card stock and layered it onto an aqua base. (What's a bear without a honey pot, right?) I layered some Fancy Pants Vintage Valentine on another aqua base and then popped PJ up on a pink circle cut with my Nestabilities. I added some buttons in coordinating colors to finish it off.
Thanks for looking!
Saturday, January 22, 2011
What's Cooking?
I made this super simple card using my Taylored
Expressions Key Ingredients kit and the What's
Cooking stamp set.
I love it when a card comes together this quickly!
I layered the stamped image and sentiment using Nestabilities Wonky Squares.
Recently my Mom has started to write down and share favorite family recipes with my sister and I. Thought that this card would be a perfect little note to thank her for the sticky rolls recipe--my family loved them.
Thanks for looking, enjoy the weekend.
Monday, January 17, 2011
Naptime!
As soon as I saw this image from My Favorite Things
I knew I had to have her. She reminds me so much ofmy youngest daughter. When she was little she would carry her bear around with her looking for someone to snuggle with at nap time!
I paper pieced her pj's and used copics to color the rest. The papers are all from my stash. I cut the image and sentiment with a Nestabilities die.
Thanks for looking!
Thursday, January 13, 2011
Wedding Card
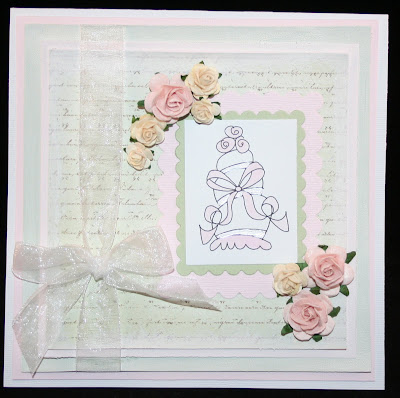
I completed my first wedding card
this past weekend.
this past weekend.
This card is for my boss and his lovely fiancee.
The cake image is a digital stamp from Pink Petticoat--the set came with a bunch of different cakes and who doesn't love cake!!!
I kept it pretty simple, added some light pink to the flowers and ribbon and also added Smooch to the layers of the cake.
The flowers are from Wild Orchid Crafts. I think they add the perfect finishing touch.
The inside quote is one I found online, quickly printed it out and then cut it out with a Nestabilities die and layered it onto the pink. More ribbon to carry over some details from the front and make it a little more cohesive.
Thanks for looking!
Monday, January 10, 2011
Calendar gift
As many of you know I am a huge Taylored Expressions fan. She has the cutest stamps and some very clever ideas as well. For Christmas she offered a 12 Days of a Handcrafted Christmas. Each day had a new idea for a quick, simple handmade gift. I fell in love with the Frame Your Imagination project and bought the supplies to make one for my Mom. Has to be one of the nicest gifts I ever made and the great thing is I only spent about twenty five bucks and used cardstock, patterned paper, and stamps that I had on hand! How great is that? I had my wonderful hubby spray paint the stand black and then I purchased TE's calendar download. The finished sheets fit perfectly inside the 6x6 sheet protectors. I used my Chick stamps from Denami Designs for the images. I love how the cute little images pop right off the page! It only took me a few hours to complete, but I do have to admit it was very difficult to put it in the mail and avoid the temptation to keep it at home.
Guess I will have to get to work on my own!
I will try to post pictures of each month as the year goes by!
Thanks for looking!
Thursday, January 6, 2011
Thanks Sew Much!
This is another cute and simple card using the From the Heart and From the Heart Funnies stamps sets from TE.
I stamped the image and then colored it quickly with copics, added some sparkle with spica glitter pens and then mounted it onto a Nestabilities die cut. The paper is more of the Modern Homemaker set from October Afternoon.
I forgot to photograph the inside, but it is stamped with Thanks Sew Much. I added some detail with some buttons (they go hand in hand with sewing, right?) and tied a simple bow with some floss!
Monday, January 3, 2011
New Year, New Goals
Happy New Year!
I can't believe how fast 2010 flew by! Seems like each year is going faster and faster and I am struggling to keep up!
Every January I try to take time and see what I have done, what I planned to do and didn't, and what I want to do next. What better time than the new year to evaluate and set goals. I know you have heard the speech a million times about New Year's resolutions, I don't think of mine as resolutions but more of a life evaluation.
I have set several goals as far as my crafting is concerned..
2 blog posts a week
2 cards a week
1 anything but a card project a month...
please understand that these are goals, I will do my best, but if life gets in the way, so be it. I am determined to enjoy my blog and allow it to be a natural extension of my stamping/card making hobby that I love.
Subscribe to:
Posts (Atom)