Saturday, December 31, 2011

Happy Birthday Ashley!


As hard as it may be to believe the little girl snuggling the naked doll in her rocking chair will be twenty six years old at the stroke of midnight. Yep, my oldest daughter is a New Year's baby! Having your birthday on a major holiday can be both a blessing and a curse, some years friends and family are a little partied out from the night before. My mom always reminds her that the whole world is celebrating with her. It also means that Christmas and your birthday are within a week of each other. For some reason in our family we have a ton of holiday birthdays--father in law celebrates his birthday the night before my daughter and my sister in law has two children one born on Christmas and one on St Patrick's day. Yep, we love a holiday birthday!


In honor of her birthday I got out the bunny stamps again--remember I told you he loves snow and cake, he is a mischievous little rabbit for sure! I colored him with copies and then used some liquid appliqué on the frosting, instead of heat setting it I added glitter and let it dry over night. The patterned paper is from My Mind's Eye Lost and Found Madison Avenue. I love the pink, green, and brown color combo. Hope you have a wonderful holiday. Happy Birthday Ashley, love you!


Friday, December 30, 2011

With Feeling

The cute little bunny is from The Cat's Pajamas. You may recognize him, besides throwing snowballs he loves birthday cake! We have been lucky enough here to avoid old man winter so far. Thank goodness, two years ago we had one of the worst winters on record, can't stand it. My idea of a snow storm involves  a very small amount of the white stuff, I have to be able to get to Starbucks! My daughter, my mom and my siblings all live in Nebraska, I used to call it home as well until the Air Force made us an offer to relocate--they offer, you move, no real negotiating or anything. After four years in Japan we ended up here in Maryland, again courtesy of the USAF and it has been our home for over ten years. Anyways, as soon as I saw this stamp I laughed, thinking of my family out in Nebraska--where they know what cold is-- and just had to have it. I stamped him with Memento ink and then colored him with copies. I added some spica glitter pen to the snow. I used a Nestabilities die for the scalloped square and then some Christmas paper that was laying on my table. The button and twine (also from TCP) finish it off.
I stamped the sentiment for the inside and added a little color with copics and the glitter pen. Think after the next snow storm to hit Omaha I will have to drop this in the mail to my daughter!
Thanks for stopping!

Sunday, December 25, 2011

Merry Christmas!


Merry Christmas! Hope you all have a wonderful day!

Saturday, December 24, 2011

O Christmas Tree


Ever have one of those days when you need a card. like yesterday! Happens more to me around the holidays. You know the feeling, you go to the mailbox and find a Christmas card and automatically your mind starts running down the list of receipents of your cards, and then you panic a little when you realize that somehow some way you missed this one important person! If you're like me, you try to find five minutes to get to stamping something! That is exactly how this card came to be, in the end I am very happy with it, it was quick to make, but doesn't look rushed! The other thing I like about it is that everything I used on it was laying on my stamping table. The Christmas tree stamp is from the dollar bin at Michael's. I colored it with copies and then added some spica glitter. I used Nestabilites for the squares and the green scalloped square. I used a corner punch on the printed card stock and then added red rhinestones to each corner of the kraft paper. I finished it off with a strip of green and white ribbon. Thanks for stopping by!


Friday, December 23, 2011

Puppy With Presents

This adorable dog looks quite comfy in the middle of all those presents, doesn't he? This stamp is from the  Give a Little set from The Cat's Pajamas. I stamped it with Memento ink and then colored it with copies, highlighting some ribbons, bows and packages with spica glitter pens. Then I cut the image out with a Nestabilities circle die and layered it onto a scalloped circle. I added some Liquid Pearls on the scallops and then finished it off with some red and white baker's twine. The paper is from a stack I picked up at Michael's.
Hope your shopping is done and unlike me you have all your wrapping completed too!
Thanks for stopping by!

Tuesday, December 20, 2011

Simple Snowman

I have had this stamp for a while now and decided to ink him up, needed another Christmas card quick! I colored the image with copies and added some sparkle with Stickles and a glitter pen. I layered the image onto a solid green circle and then a scalloped pink circle. I used liquid pearls for the details on the scallops and finished it off with a little bit of baker's twine.
Thanks for stopping by!

Wednesday, December 7, 2011

Hibernating....


This furry fellow is from My Favorite Things. Fred Bear is enjoying a long nap. I stamped him with Memento ink and colored him with copics. Then I sponged just a small amount of chalk to add some dimension to the image.  I layered the image onto some red card stock and then added a pop of color with some patterned paper from October Afternoon's Campfire pad. I ran the green paper through my Cuttlebug with the Seeing Spots embossing folder.

I love the sentiment, included in the set. I stamped it onto white card stock and then used a SU corner punch. I left some solid green card stock on the inside for a note.
Thanks for stopping by, have a great day!


Tuesday, December 6, 2011

Three Kings

These royal kings are part of a set of digital stamps I bought online from Digi Stamp Boutique. I printed them onto kraft paper and then colored them with copics and added some sparkle to their crowns and gifts with spica pens.
I cut the image out and then rounded the corners on the right side and added some blue rhinestones in the left corner. The patterned paper is from My Mind's Eye. The solid brown card stock was embossed with a snowflake folder. To finish it off I added a green seam binding bow.
As much as I love the cute and sparkly, my favorite Christmas cards are simple ones that remind us of the true meaning of the holiday.
Have a great day and thanks for stopping!


Monday, December 5, 2011

Hokey Pokey Princess

 This pretty little princess is a Nellie Snellen stamp called Hokey Pokey. Isn't she just the cutest? I colored her with copies in shades of blue and then added some clear and silver spica to her wand, snowflakes, presents and her little booties. I added some aquamarine glitter around her collar and sleeves. Then I cut the image out with a Nestabilities die.


I layered the image onto some vellum snowflake paper and added lots of rhinestone swirls. I finished her off with a snowflake topped with a blue gem. 
Have a great day and thanks for stopping!

Sunday, December 4, 2011

Peeking Gift Tag

A few weeks back I posted pictures and details for a recipe book I made for my oldest daughter. I finally have the book wrapped and ready to drop in the mail tomorrow, but I needed a tag for the box. No store bought to/from was going to do my gift justice so I got to work on this little cutie. PJ Bear is from The Cat's Pajamas. I love PJ, he is so darn cute.
I stamped him onto kraft paper and then colored him with copics, added some spica glitter to the bow. I used a die from My Favorite Things to cut the tag out and then layered some My Minds Eye Holly Jolly onto the brown card stock. I added a green circle embossed with my seeing spots folder and then added PJ. Hard to tell from the pic but PJ is actually popped up on dimensionals. The bakers twine is the new Holiday Divine Twine from The Cat's Pajamas. I finished it off with a green button, acrylic snow flake and a red heart.
I can't wait for my daughter to receive this package. One of the many times where it is truly better to give than to receive.
Have a great week!


Tuesday, November 15, 2011

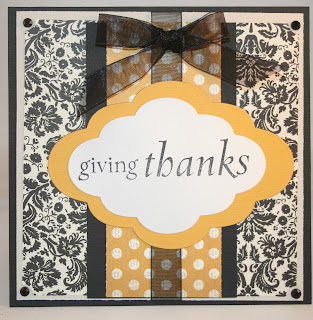
Giving Thanks

It seems like every year I have intentions of making Thanksgiving cards. Just a few for family that we won't see over the holiday. This year I actually got them made--not with the stamp set I had ordered specifically for Thanksgiving cards. The important thing to remember is that I got them done.
I strayed a little bit out of my comfort box and used some non-traditional colors and went with a sentiment only card, but I love the finished product. The stamp is from an old Unity Stamp Co. set called Simple Blessings that had yet to be inked up. I used a couple of different My Mind's Eye patterned papers for these two cards. I kept both cards simple with baker's twine and ribbon and a couple of pearls on one and black rhinestones on the other. I love the clean and simple look. What do you think?
Thanks for stopping by!


Monday, November 14, 2011

Family Recipe Book

It has been a long time since I posted, but I hope you will agree with me when I tell you it was worth the wait. 
My oldest daughter lives in the Midwest with her new hubby and my granddaughter. Hubby, my youngest daughter and I are in southern Maryland. We were hoping that they would be able to come out here for Christmas this year, but since my oldest daughter just started a new job it doesn't look as if that is going to happen. I'll admit, I was very disappointed, but decided that maybe I could send a little bit of Christmas to her. 
I made a recipe book of the cookies, candy, bars and treats I make at Christmas time.


 This is a picture of the cover. I used my Cricut machine to cut the tree and reindeer (PDDU), then added some highlights with a white gel pen, black marker and liquid pearls. The snow was cut with a scalloped punch and then layered, I added some stickles for a little sparkle. Merry Christmas was stamped and then heat embossed with PTI white filagree embossing powder. I added some red ribbon and a couple of rows of liquid pearl dots to finish it off.
When I was done I used my Cinch to bind it all together. I used white spirals and added ribbons.
The book is made up of five pocket pages, all sewn on to make sure they will last.  I printed the recipes on my computer, wrote notes on the back of each and then used My Story laminator to laminate the pages. Easy for her to pull out and keep on the counter while she is baking or even stick in her purse for a trip to the grocery store.  
 After each recipe was laminated I punched a hole with my crop a dile and added eyelets and more ribbon.

I usually make twenty or so different treats, some old favorites and a couple of new ones too. I think this is a great way to share these with my daughter. I am going to have a hard time putting this in the mail to her next week, it has to be one of the nicest things I have ever made (IMHO). I am going to pick up a couple of cute rubber spatulas and some of the spices she will need and send it on it's way.
Thanks so much for stopping by, I really appreciate your patience!

Tuesday, October 25, 2011

Vampires can be cute

As I explained yesterday I have been rushing a little bit to finish a couple of Halloween cards I need to mail to Nebraska. This has to be my favorite Michael's Halloween dollar stamp. I colored my fanged friend with copics and then layered the image onto a red circle and then a grey scalloped circle. I added white dots to the scallops to tie in with the patterned paper from My Mind's Eye. He got the tulle treatment as well and as a last minute thought I added some sparkle to his shoes with a glitter pen. Thanks for looking!

Monday, October 24, 2011

More Halloween

It seems like every year I start making Halloween cards and favors as soon as my youngest daughter goes back to school in August. For some reason though, I am always scrambling to make sure I have everything done in time to mail to my family in Nebraska. Not quite sure how it ends up that way. If you are like me you also plan Thanksgiving cards every year and if you are truly like me only end up with a few completed in time to mail. Time sure does have a way of getting away from me.
Anyways, enough blabbing about how I always running behind and onto the card. This is one of the dollar stamps I picked up at Michaels a while back. I colored him with copies and then added some silver to his bolts. I layered the image onto a scalloped circle and added some silver dots for some extra pop! I cut the green strips and layered them onto the black card base and added a little black tulle to make him stand out a bit. Cutest Frankenstein I have seen in a while!
Thanks for stopping by!

Wednesday, October 19, 2011

Trick or Sweet


The theme for this month's Blast from the Past Blog Hop is Trick or Sweet. Which just happens to be the name one of my favorite Taylored Expressions stamp sets. I decided to make a little Halloween treat bag that I can fill with stickers and dum dum suckers for my granddaughter. I used a black treat bag I had on hand and then layered some deep purple card stock along with some black polka dots from My Mind's Eye. I ran the green card stock through my crimper and then used a Nestabilities die to cut out the sentiment. I finished it off with three purple crystals across the top.


This is a close up shot of the sentiment to show some detail. Love the polka dots!


This is the other side of the bag. I stamped another sentiment and then cut it out with a file stamp punch. I colored Frankenstein cuppie with copics and then layered it onto some black tulle. I used the same polka dot paper and added a bit of purple glittered ribbon. Every girl needs a little glitter!!! Thanks so much for stopping by!

Friday, October 14, 2011

Puppy Present

 This is my entry for The Cat's Pajamas Tuesday challenge. I'll admit when I saw the star I was a little perplexed, but once I saw this puppy popping out of the present I knew I could make it work. That is what challenges are all about right?! I am so glad that I decided to get this pooch inky! I stamped and colored him twice and then cut one of them out and layered it on top of the other image with some pop dots to add some dimension. Hard to tell from the pic, but trust me it works. I used a couple of scalloped rectangles to layer the darling dog on and then got to work on the star. I dug through my dies quick and figured out that I didn't have any that would work. No problem, I fired up my Cricut and cut one from a Doodle Charms cartage in no time. Easy peesy lemon squeeze--or so they say. I added some hand drawn stitched to the edge with a gel pen. I used a Sizzix embossing folder for the green card stock. The patterned paper is from Cloud Nine, I love how the dots match the present. I finished it off with one of the sentiments from the set.
Have a great weekend and thanks so much for stopping by!


Thursday, October 13, 2011

You Dig Me?


This little gardner is from There She Goes clear stamps My Little Friend set. Isn't he cute? Looks as if he is ready to get right to work! The thing I love about this set of stamps is the sentiments--You Dig Me??? Funny stuff! Anyhoo...on to the deets.
I colored my little friend with copic markers and then sponged the edges of the stamp, the card stock layer and the pennants with Memento brown ink. The fabulous paper is another MME beaut, Blink of an Eye from a 6x6 stack.
I added the pennants in the corner and then cut the sentiment into three pieces. I am loving these challenges lately, gives me a good reason to spend some time stamping and it takes me a little bit out of my comfort zone. Kind of a think outside my usual box.
Have a great day and thanks so much for stopping by!

Monday, October 10, 2011

TCP Tuesday

I am just going to get this one in under the wire. This challenge was to "Hype the Type" using type as a focal point. I colored PJ with copics and added the white details with a gel pen. I layered the image onto a red scalloped rectangle panel. The snowflake and button were in my stash.
I cut the pennants out with a MFT Die and stamped JOY on them. They are attached with pop dots and some red bakers twine. I love PJ and am so happy with how this card turned out, another one to add to the slowly growing pile of completed Christmas cards. Thanks so much for stopping by!